
It’s almost time to plant winter squash here in zone 5. Last year, we ate home-grown winter squash from October until the end of April. Stocking our basement with winter squash each fall is perhaps the simplest way that we keep eating from the garden through the winter. When it’s snowing outside, winter squash are among my favorite things to eat: what could be cozier than an oven filled with roasting butternut squash or a pot of kabocha squash-and-beef stew on the stove?
Squash are probably the easiest vegetables I grow. Just plant the seeds, water occasionally, and watch them take off. Their giant leaves smother everything, so you don’t even have to weed. Just remember to harvest your winter’s supply before the first hard frost (with a wheelbarrow, if necessary).
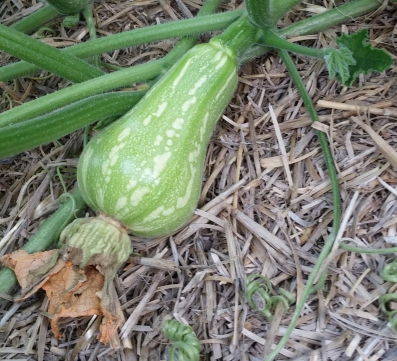
Winter squash are one of the last crops I plant in the spring. They are named for their phenomenal storage quality, not their growing season, and shrivel at the slightest hint of frost (like their relatives, which include cucumbers, melons, summer squash, and zucchini).
I usually try to squeeze in one too many squash plants and then spend September rescuing the rest of my garden from the creeping vines: they tend to sprawl. Last summer, tendrils kept sneaking out beyond my fence and would have taken over the whole hillside if the deer hadn’t kept them pruned.

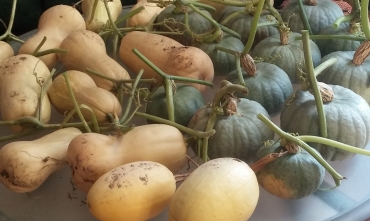
There are many types of winter squash. Look into the storage time for each variety before planting: one year I planted too many spaghetti squash, which only keep for a few months. While we managed to eat them all, I heard a few complaints when they ended up on the menu more than once a week. Below are a few of the most popular varieties of winter squash that I’ve grown.
Acorn Squash are relatively compact plants, lacking the vines of other squash varieties. The squash are small, tasty, easy to prepare, and keep for two to three months after harvest. They don’t need to be cured (unlike other squash; see below for more details). Halved and roasted, acorn squash are a delicious side dish.
Spaghetti Squash will keep for two to three months, but the flavor is best right after harvest or especially when picked while the skin is still green. As the name implies, spaghetti squash are great pasta substitutes: just cut them in half, bake or microwave (after poking holes in the skin), and use a fork to pull out the cooked insides. They resemble angel hair pasta when cooked and are great with spaghetti sauce or pesto. Our favorite thing to do with spaghetti squash is to fry them into latkes.
Butternut Squash plants are highly productive, larger plants. The squash can be stored for up to 6 months, and their taste improves after the first two months of storage (as is the case for kabocha and hubbard squash). Highly versatile, they are our favorite squash to eat. They are delicious oven-roasted, pureed into soup, or coated with oil and baked into long, thin ‘fries’.
Kabocha Squash resemble bluish-grey pumpkins. While they were curing inside our house last fall, several people thought that they were pumpkins that we had painted grey for Halloween decorations. I planted two ‘hills’ and the plants tried to take over the entire garden. Luckily, they keep for up to 6 months after harvest. I had never tasted kabocha squash before I grew them, but fortunately they have a good flavor, although they can be a bit dry. We liked them in soups, stews, and curries. Unlike other winter squash, the skin is edible, making them quick to prepare and adding extra nutrients and fiber to the meal.
Blue Hubbard Squash are huge squash, sometimes reaching 15 pounds. They keep for up to 6 months. I stopped growing them because their size made them a chore to prepare and I didn’t love the flavor.
Planting and Curing Tips:
- Plant squash seeds outside about a week after your last frost date, or start seeds inside a few weeks before transplanting them into the garden.
- Plant seeds 1 inch deep. Choose the ‘hill’ method, or plant in rows. Hills should be 12 inches in diameter, 6 feet apart, with 2 or 3 plants per hill. If planting in rows, leave 6 feet between rows for acorn squash and around 20 inches between plants within a row. Larger varieties should have 12 feet between rows and 26 to 36 inches between plants. Unfortunately, this spacing does not fit well into the 30 inch wide, permanent beds that I rotate all my vegetables through. I space winter squash rows more tightly than the above recommendations, which cramps my paths during late summer but allows me to grow them within my garden’s confines.
- Use standard crop rotation techniques to avoid diseases and pests. If squash beetles become a problem, cover your squash seedlings with floating row covers until they flower.
- Add lots of compost to your soil before and after planting squash.
- If you live in a dry climate that requires irrigation, drip irrigation is preferable to sprinklers: more water reaches the roots (instead of evaporating from the large leaves), and the leaves stay drier (which inhibits powdery mildew).
- To harvest, cut the stems about four inches above the squash after the first frost or when the vines have turned mostly brown. Avoid carrying squash by their stems: they won’t keep well if the stem has broken off. Hard frosts (below 28 degrees F) damage squash, so make sure to move them to a protected area before the first hard frost.
- ‘Cure’ squash by letting them sit for a week or two in a warm, sunny spot with good ventilation (this step is not necessary for acorn squash, and there is some debate about whether it is required for other varieties).
- After curing your squash, move them to a cool, dry place (between 50 and 60 degrees F), and enjoy them through the winter.


Thank you for such an encouraging and clear, easy to follow post!
LikeLike
Thank you!
LikeLike
I love squash. Another winter squash I enjoyed was a buttercup squash very similar to the butternut. It was slightly sweeter and kept a long time as well.
Also, your zone 5 looks beautiful! Very different to the zone 5 type gardening we have in Chicago. Love the blog!
LikeLiked by 1 person
I’ll have to try buttercup! Thanks!
LikeLike